Your spin bike may need occasional repair to perform at its best. This article with help you to learn about simple spin bike repairs that you can do yourself. The best spin bikes are complex and costly pieces of equipment. Over time and in certain cases, they can get damaged due to external factors or improper usage. If the product is in warranty, there is nothing safer than calling up customer care and following the warranty claim and repair procedure. If it isn’t or the company doesn’t cover the damage involved, you may not want to give up your indoor workout because of the costs of the local repair shop. While some of the more serious forms of damage would require such a shop’s services, simple spin bike repairs can be carried out by you without major expenses.
See you can carry out basic spin bike repairs on your own.
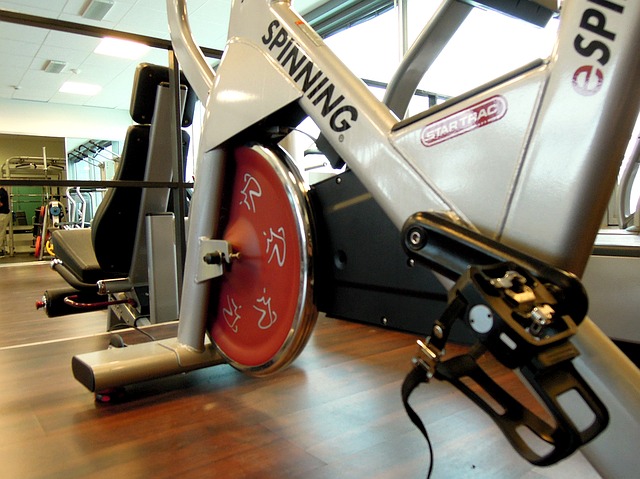
Worn out or Damaged Pedals
Since pedals represent the most used parts of the spin cycle, they do tend to wear out even when one carried out regular spin bike maintenance procedures. You can find pedals at most fitness equipment shops. Pedals can be changed with ease using only a wrench and some machine lubricant/lubricating oil.
Removing a Pedal
- Remove any attachments (like straps) that may be attached to the pedals.
- Bring the pedal you wish to work upon to a neutral position. Most users prefer to use the position closest to the ground as this ensures that gravity doesn’t cause the pedal to move too much during movement.
- Take an 8mm allen key and the “handle end” against the back of the pedal such that it fits into the hole meant for loosening the pedal from the shaft. Ensure that the shaft of the wrench is pointing towards the rear of the bike.
- If the product comes with a drive mechanism, note which side the drive mechanism is on. For the drive side, you should rotate it counterclockwise. And for the non-drive side, you should turn it clockwise.
- With the wrench firmly inserted, push the push the key in the right direction till you feel the pedal coming loose.
- Pull out the handle end and insert the shaft end of the key to continue loosening the pedal till it comes off.
Replacing a Pedal
- On your replacement pedal, you should find a small arrow drawn on the inner side of the pedal. If on aligning it with the pedal hole it points in the direction opposite to the one you rotated the older pedal, you have inserted the correct replacement. If not, you should choose the other pedal.
- Align the pedal with the pedal socket/hole and push it in gently.
- While holding the pedal in place, insert the shaft of the allen key into the socket and start rotating it in the direction opposite to the one you used to remove the older pedal.
- Once the pedal appears tight enough, insert the allen key handle end and finish tightening the pedal.
- Follow a similar procedure for the other pedal. While carrying out this second phase of rudimentary spin bike repairs, ensure that you follow the correct rotating direction.
Note: If you wish to avoid carrying out frequent maintenance, you can apply a layer of high quality lubricating oil/grease on the tip of the pedal that goes into the shaft. Avoid adding too much oil/grease as this may cause the pedal to come loose while rotating it quickly.
Wobbling/Damaged Bike Hub
A wobbling bike hub is generally the result of the hub being excessively damaged due to the body hitting against the hub too often. This is one of the common spin bike technique mistakes. To carry out basic spin bike repairs on your hub, you would need a wrench, a cone wrench and a replacement hub or hub bolt (if you don’t wish to replace the entire hub).
Removing Your Spin Bike Hub
- Take note of the screws holding the resistance hub of the spin bike. (Note that resistance hubs are generally found only on the rear wheel)
- Use the wrench to loosen the screws one by one. Sometimes the screws located on one side may not match those on the other side. Therefore, take careful note of the screw arrangement while carrying out rudimentary spin bike repairs.
- Once the resistance mechanism comes loose, it should also allow you to remove the wheel. Take the wheel off.
- The placement and structure of the hub varies from product to product. Use the manufacturer’s manual to find the hub.
- Use a cone wrench to remove the exterior parts. These should expose the hub bolt.
- Remove the hub bolt carefully using the wrench. Doing so would cause the hub to come loose. You can decide whether to replace just the bolt or the entire hub. If you choose to do the latter, skip the next step.
Replacing the Bub on Your Spin Bike
- In case you wish to replace the bolt, unscrew it from the other end of the hub and remove it. Put in the replacement bolt and screw in till it is secure.
- Take the replacement hub/original hub with new bolt and place it back into the wheel. Replace the exterior parts.
- Take the wheel and align it with the spin bike frame.
- Reattach the resistance mechanism screws in the same order you removed them.
- Rotate the wheel or try out a few intervals to see if the replacement has stopped the wobbling hub issue.
Conclusion
We hope this short guide would help you prolong the lifespan of your spin bike so that you can reap its workout benefits. While the above list of basic spin bike repairs may not be very extensive, they do cover the most common issues that regular spin bike owners might face as their bikes or parts wear out. That said, there may be other issues with the bike that may cumulatively cause a certain problem. If the above solutions don’t work, it is best to consult a licensed/certified technician as adventurous repairing can lead to permanent damage to the product. You should avoid carrying out repairs on one’s own wherever there are electrical parts involved.
Be sure to read our guide to spin bike maintenance to help keep your spin bike performing at its best